

Sections let you run one class for several groups of students, such as Period 1 and Period 3 of the same course. You build the activities once. Each section gets its own students, join code, gradebook and chats, and you can give an activity to some sections only or set different dates for each section.
Anyone with Can edit access to a class can turn sections on and manage them. Teachers with Can edit access teach every section. Students belong to one section each and never see the section switcher.
Turn sections on
- Open the class and select Settings in the class sidebar.
- Turn on the Sections switch. Flint adds a first section called Period 1.
- Select Add section for each other group. Each new section gets the next period number, such as Period 2.
- Type over a name to rename a section, for example "Period 3". Every section needs a name of up to 100 characters. No two sections in a class can share a name, even with different capital letters: "Period 3" and "period 3" count as the same name.
- Select Save at the top of the page.
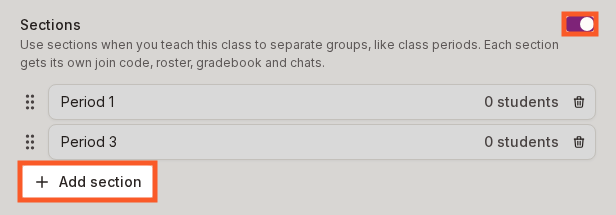
You can also turn on Sections on the General page of the form when you create a class. A class can have up to 50 sections. Drag a section by its handle to change the order.
Remove a section or turn sections off
Select the bin icon next to a section to remove it. If the section has students, Flint asks where they go: choose another section or Unsorted under Move students to, then select Move students and remove. Their work, grades and chats move with them. A class with sections keeps at least one section, so the last section's bin icon is greyed out.
To stop using sections, turn off the Sections switch. Every student stays in the class; only their section is removed. Flint lists what changes:
- Every activity opens to the whole class. If sections had different dates, an activity opens at the earliest start date and closes at the latest due date.
- Section join codes stop working.
- Students lose their section. If you turn sections on again, you place them again.
Tick I understand, select Turn off sections, then select Save.
Switch between sections
The class sidebar shows the class name with the section you are viewing beneath it, or All sections and the number of sections. Select it to open the menu. Under Sections, choose All sections or one section. Each entry shows its number of students.
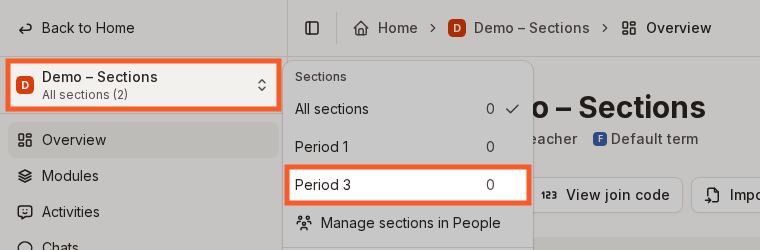
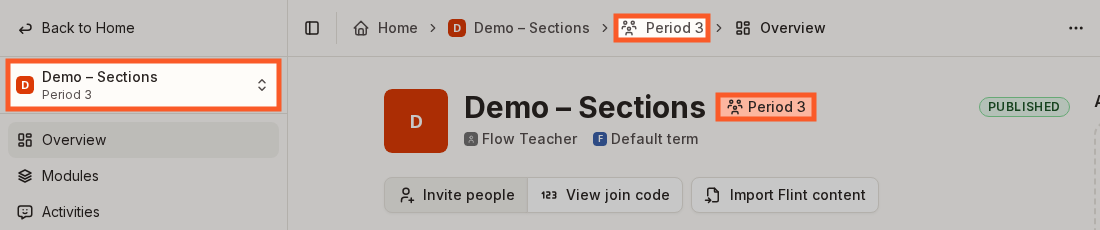
Flint shows "Now viewing Period 3" and keeps you in that section as you move between the pages in the class sidebar. While you view a section:
- The path at the top of the page reads Home, the class name, the section name, then the page.
- The class's Overview page shows the section's name in a tag next to the class name, and its student count reads "Students in Period 3".
- Activities lists only that section's activities.
- The chats list in the class sidebar shows "All Period 3 chats".
- Analytics counts only that section's students.
Choose All sections in the same menu to see the whole class again. In All sections:
- Overview lists each section with its number of students.
- Activities has a Sections column. When sections have different dates for an activity, its due date reads "Varies by section".
Give students a join code
Each section has its own join code, and the class has one for the whole class.
- On the class's Overview page, select View join code. The People page has the same button once the class has people in it.
- Under Join code for, choose Whole class or a section. The list starts on the section you are viewing.
- Select Copy code and share it with that group.
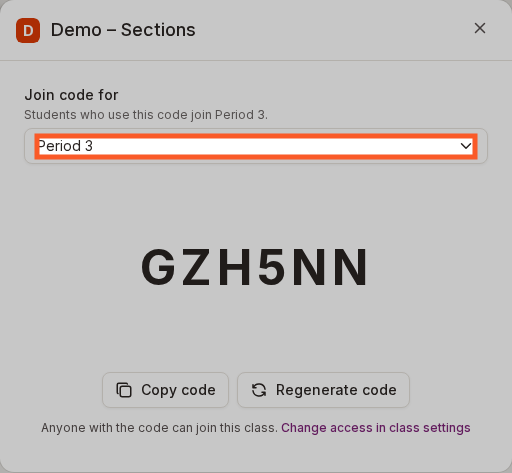
Students who use a section's code join that section.
Students without a section choose one
Any student without a section sees "Which section are you in?" when they open the class or one of its activities. That includes students who used the whole-class code, students who were in the class before you turned sections on, and students added by roster sync. They can pick their section or select Skip. A student who skips isn't asked again in that browser, but is asked again on another device. If they skip, you place them yourself.
Students can't change their own section. Once a student has picked a section, Flint tells them "Sorry, you're already in a section. Please ask your teacher if you need to move." Only a teacher can move them, on People.
Place students in sections
Open People in the class sidebar while viewing All sections. The table has a Section column. Teachers show All sections there. For each student, choose a section from their menu.
To move several students at once, tick them, select Move to section, choose the Section, and select the confirm button, which reads Move 3 students for three students. Teachers teach every section, so any teachers you ticked stay as they were, and the dialog says so.
Students without a section only see activities that go to every section. When some students have no section, a banner at the top of People says how many need one. In All sections, select Show them (or Show this student when only one student needs a section) to open the No section tab, which lists them. A student you place stays on that tab until you save, so you can work down the list. While you view a section, the banner's button reads Open All sections instead.
Select Save at the top of the page and confirm with Save to keep your changes. Nobody moves until you save.
To add students straight into a section, switch to that section first, then select Add people. The Section field in the dialog starts on that section, and students you add join it.
Roster-synced classes
Students added by roster sync arrive with no section. Place them on People, or let them choose a section when Flint asks them. A later sync keeps the sections students are already in.
Give an activity to some sections
Which sections get a new activity depends on where you create it:
- Created while viewing All sections, the activity goes to every section, with the same dates.
- Created while viewing one section, the activity goes to that section only. Set different dates for sections starts turned on, with only that section ticked.
To change which sections get an activity, or give sections different dates:
- Open the activity's settings and open Assignment.
- Turn on Set different dates for sections. If it was off, every section starts ticked. If you created the activity while viewing a section, it is already on, with that section ticked.
- Tick each section that should get the activity, and untick any that shouldn't. An activity needs at least one section.
- Each ticked section starts with the activity's own dates. Change a section's Due date, and its Available from date where the activity has one. An empty Due date means no due date.
- Save the activity.
Students in an unticked section, and students with no section, don't get the activity.
You can also set each section's dates from Manage availability in the activity card's menu. On the calendar, you can't drag an activity with different dates per section to a new day. Its tooltip reads "Each section has its own dates for this activity. Change them from Manage availability."
Duplicate an activity
A copy in the same class keeps its section dates. A copy in another class drops them and goes to that whole class.
See sessions and grades by section
On an activity's page, the section menu above the sessions table lists All sections and each section that gets the activity. The same menu sits under Sessions in the activity's sidebar. Choose a section to see only its students' sessions.
In All sections, the Overview tab of the sessions table has a Section column. Where the table offers Download as CSV (under More actions), the file has a section column too.
The Gradebook follows the section you are viewing, and shows only that section's students. In All sections:
- Each student's section shows under their name, or Unsorted if they have none.
- An activity with Set different dates for sections turned on lists the sections that get it under its column title.
- A student whose section doesn't get an activity shows Not assigned to section in that activity's column.
See the gradebook guide for everything else the gradebook does.
What all sections share
Sections share the class's activities, Curriculum, Resources, tools and announcements. The class context and curriculum materials on Curriculum, and the files and links on Resources, are the same for every section. Teachers see a note on both pages saying so. Announcements go to the whole class, whichever section you are viewing.